Sharing Files & Posts: Public vs Private
Understand the difference between public and private content in UnionTab and learn how to share documents and updates effectively.

UnionTab gives you complete control over who sees your content. Whether you're uploading important documents like collective agreements and meeting minutes, or publishing news updates to keep your membership informed, understanding the visibility settings is key to effective communication.
This tutorial covers two essential workflows: uploading and organising files, and creating news posts — including how to control whether content is public or members-only.
Part 1: Uploading Files
Accessing the File Manager
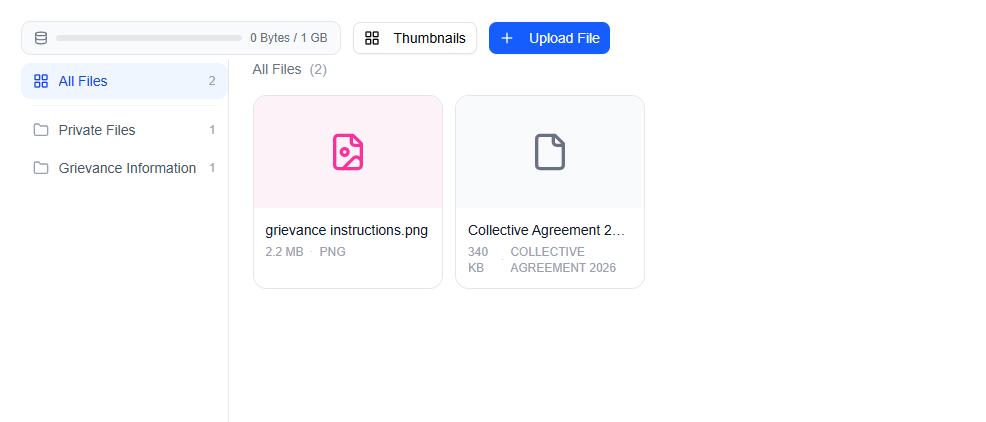
Click the Files tab in the top navigation bar (the folder icon). You'll see your files organised in a clean, intuitive layout: category folders on the left sidebar and a grid of file cards on the right.
Admins can reorder categories using the up/down arrows and rename them using the pencil icon — keeping your file library tidy as it grows.
Uploading a New File
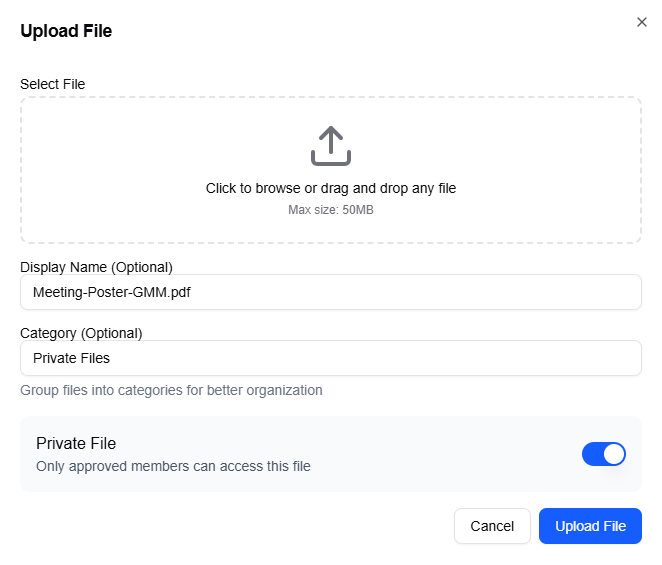
Click the Upload File button to open the upload dialog. Here's what you'll see:
- File upload area — drag and drop a file or click to browse your computer. Any file type is accepted, up to 50MB per file.
- Display Name — optionally rename the file to something more descriptive. If you leave this blank, the original filename is used.
- Category — type a category name such as "Bylaws," "Contracts," or "Meeting Minutes." As you type, existing categories are suggested so you can keep things consistent.
- Private File toggle — enable this to restrict access so only approved members can view and download the file.
Click Upload File to save. For PDF files, a thumbnail preview is automatically generated, making it easy for members to identify documents at a glance.
Managing Your Files
Once uploaded, each file appears as a card in the grid. Cards display the file icon (colour-coded by file type), filename, file size, and extension. Files marked as private show a "Private" badge so you can tell at a glance what's restricted.
Hover over any file card to reveal the action menu:
- Open — view the file in your browser
- Download — save a copy to your computer
- Edit — update the display name, category, or visibility (admins only)
- Delete — remove the file permanently (admins only)
Owners can also see a storage usage widget showing how much of your plan's storage has been used — helpful for keeping tabs on capacity.
Public vs. Private Files
Understanding the difference between public and private files is crucial for managing your union's information:
Public files are visible to anyone visiting your union's page, including non-members and the general public. These are ideal for:
- Bylaws and constitution
- Press releases
- Recruitment materials
- General information about your local
Private files are only visible to approved, logged-in members of your local. Use these for:
- Collective agreements and contracts
- Meeting minutes
- Financial reports and budgets
- Internal communications and strategy documents
Part 2: Publishing News Posts
Accessing the News Feed
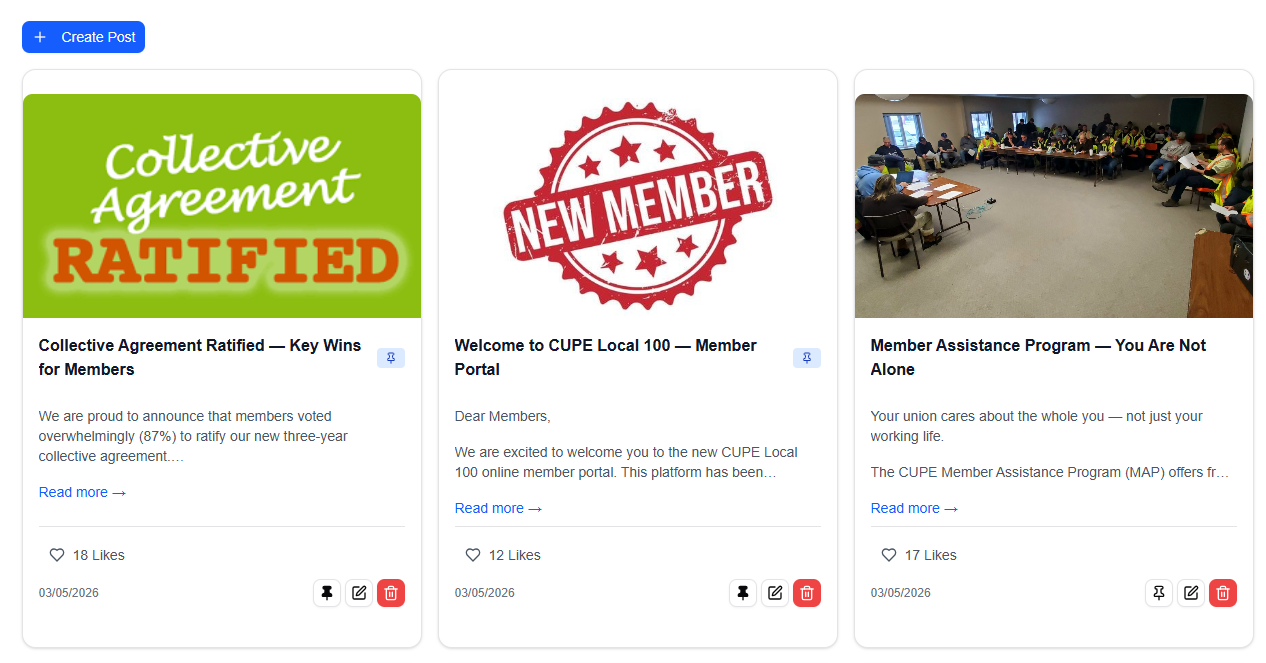
Click the News tab in the top navigation bar (the newspaper icon). This is the default landing tab for your union's page — it's the first thing visitors and members see, so keep it active with regular updates.
Creating a New Post
Click the Create Post button (the + icon) to open the post creation dialog. Here's what to fill in:
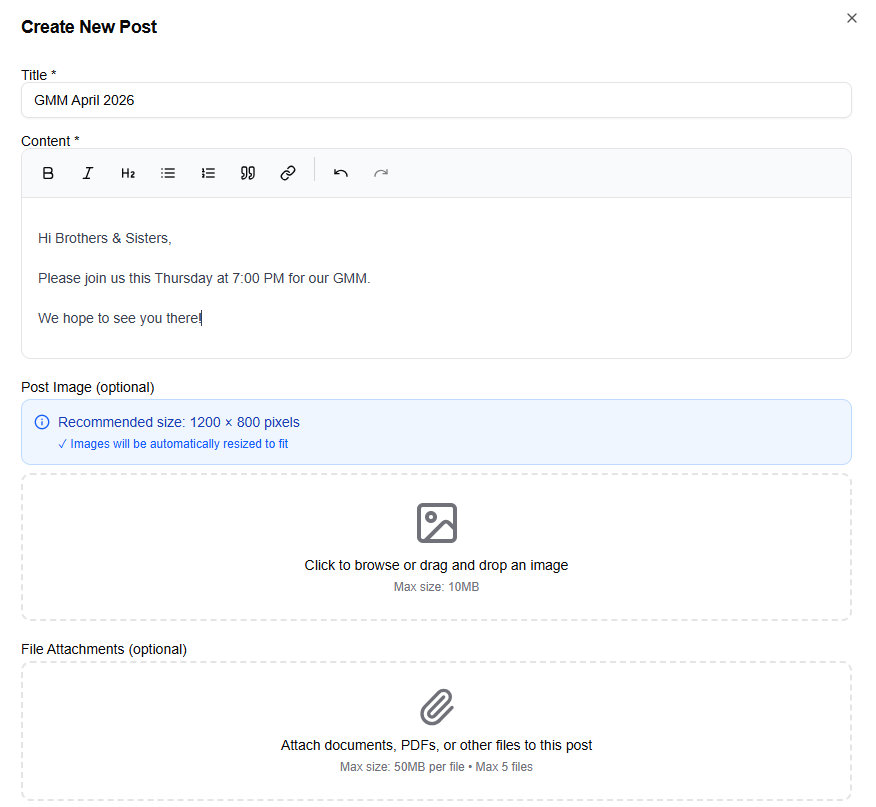
- Title — enter your post title. This is required and will appear as the headline. Make it clear and attention-grabbing.
- Content — use the rich text editor to write and format your post. You have full formatting controls: bold, italic, headers, links, lists, and more. This field is required.
- Post Image — optionally upload a featured image to accompany your post. Image files only, 10MB maximum, with a recommended size of 1200×800 pixels for the best display.
- File Attachments — optionally attach up to 5 files of any type (50MB each). Perfect for attaching related documents, flyers, or forms.
- Private Post toggle — enable this to make the post visible only to approved members.
- Post Author — choose to publish as your Union Name (the default, for official communications) or Your Name (for personal messages from leadership). Use the two selector buttons to make your choice.
Click Create Post to publish immediately.
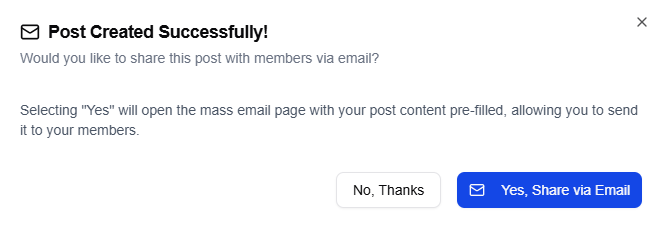
After Creating a Post
Once your post is published, a confirmation dialog appears: "Post Created Successfully!" Along with it, you'll see a helpful prompt: "Would you like to share this post with members via email?"
- Click Yes, Share via Email to be taken directly to the Mass Email page with your post's content pre-filled as the email body. All you need to do is select your recipients and send.
- Click No, Thanks to dismiss the dialog and return to your news feed.
This integration between posts and email is one of UnionTab's most powerful workflow shortcuts — publish once, distribute everywhere.
Public vs. Private Posts
Public posts are visible to everyone, including visitors who aren't members and search engines. This makes them excellent for:
- Public announcements and press releases
- Union victories and achievements
- Community events and outreach
- Industry updates and commentary
Private posts (Members Only) are visible only to approved, logged-in members. Use these for:
- Contract negotiation updates
- Internal strategy discussions
- Member-specific announcements
- Sensitive information that shouldn't be public
Quick Tips
- Pin important posts — use the pin icon on any post to keep it at the top of your news feed. Perfect for ongoing campaigns, election notices, or critical updates that members shouldn't miss.
- Share posts via email — take advantage of the post-creation prompt to notify members instantly. Don't assume everyone checks the website regularly.
- Use categories for files — organise documents into clear categories like "Contracts," "Meeting Minutes," and "Training Materials." It makes a huge difference as your file library grows.
- When in doubt, start private — you can always change a file or post's visibility later. It's easier to make something public than to retract information that's already out there.

